Diagram Overview

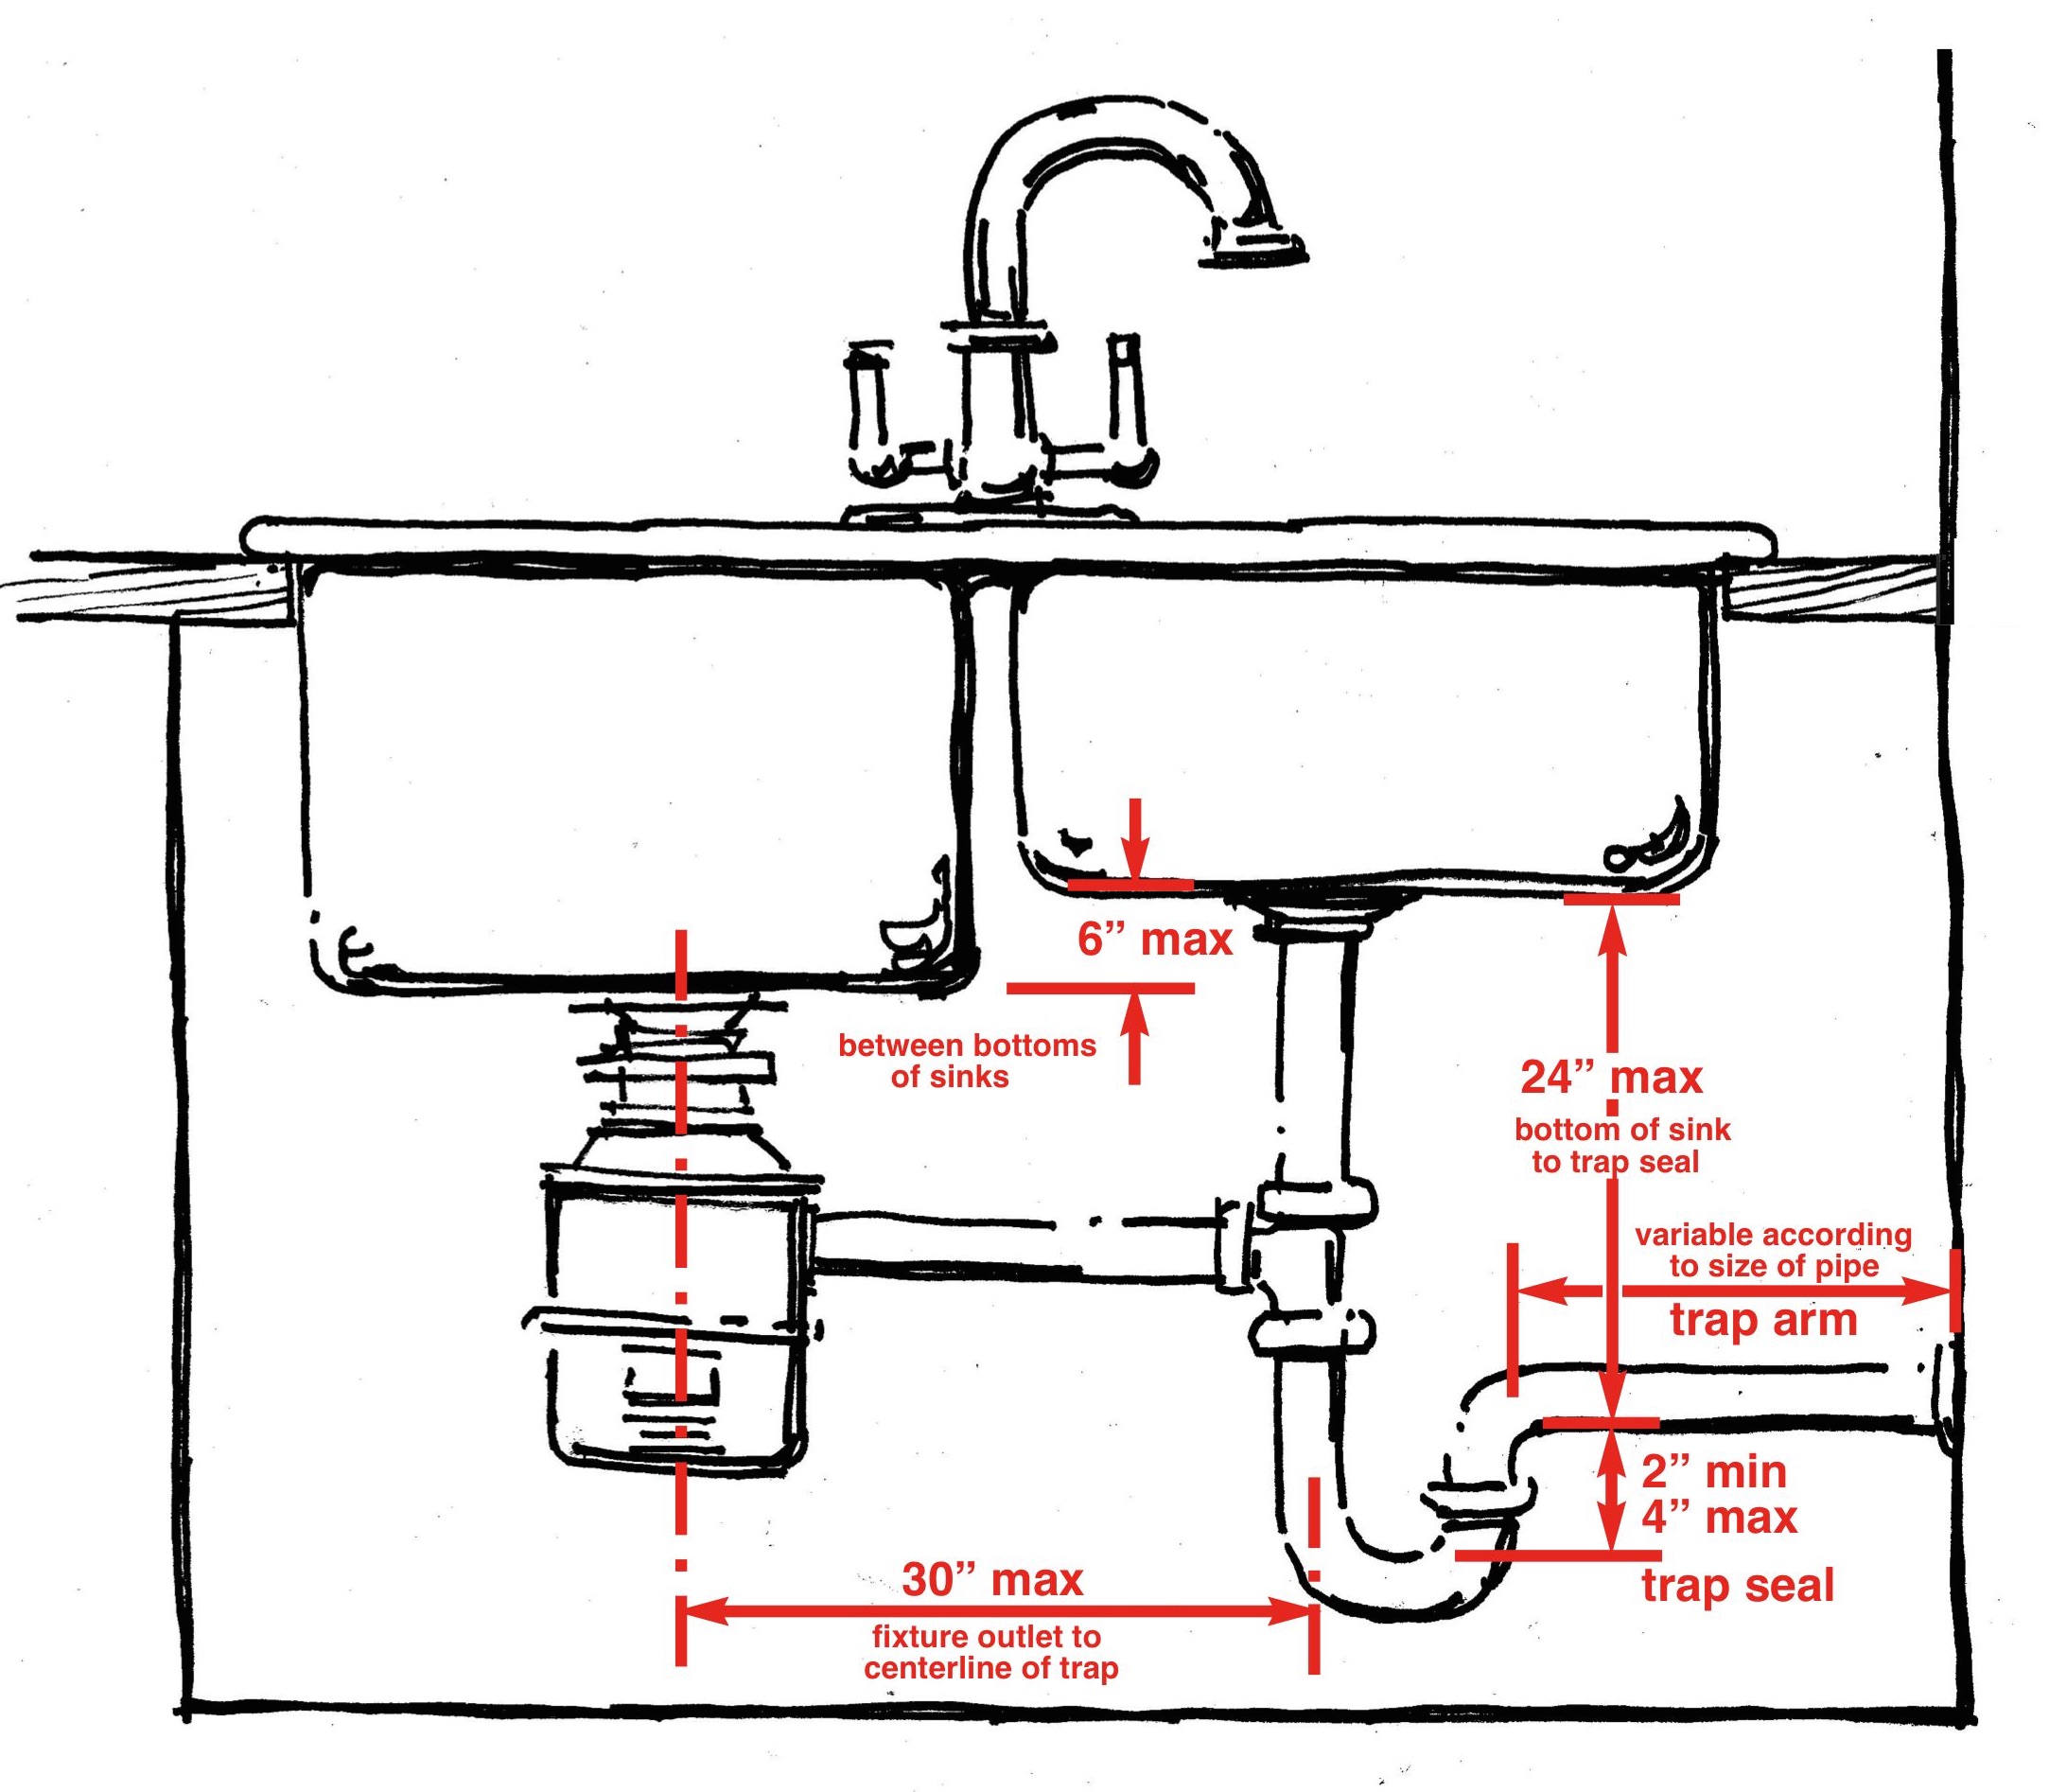
Bathroom sink drain parts diagram – The bathroom sink drain diagram provides a visual representation of the components that make up a typical sink drain system. It helps users understand the function and placement of each part, enabling them to troubleshoot and repair issues effectively.
To get rid of the bad smell coming from the sink, you can use a bathroom sink drain parts diagram to understand how the drain is structured. By learning about the components, you can locate the source of the smell and apply appropriate cleaning methods.
You can find detailed diagrams online, such as the one in bathroom sink smells when water runs , to guide you through the process.
The diagram typically includes the following components:
| Part Name | Function | Material | Image |
|---|---|---|---|
| Sink Strainer | Prevents hair and debris from clogging the drain. | Stainless steel, plastic | [Image of a sink strainer] |
| Tailpiece | Connects the sink drain to the trap. | PVC, metal | [Image of a tailpiece] |
| P-Trap | Prevents sewer gases from entering the bathroom. | PVC, metal | [Image of a P-trap] |
| Trap Arm | Connects the P-trap to the drainpipe. | PVC, metal | [Image of a trap arm] |
| Drainpipe | Carries wastewater away from the sink. | PVC, cast iron | [Image of a drainpipe] |
| Flange | Connects the sink to the drainpipe. | Rubber, metal | [Image of a flange] |
| Stopper | Plugs the sink drain to retain water. | Rubber, plastic | [Image of a stopper] |
Types of Drain Parts

Bathroom sink drains consist of several components that work together to prevent water from overflowing and to catch debris. These parts include stoppers, strainers, and pop-up assemblies, each with its own advantages and disadvantages.
The choice of drain parts depends on factors such as the type of sink, the desired level of water flow control, and the aesthetic preferences of the homeowner. Understanding the different types of drain parts and their respective features can help you make an informed decision when selecting and installing them.
Stoppers
Stoppers are the most basic type of drain part, designed to seal the drain opening and prevent water from flowing out. They are typically made of rubber or silicone and are inserted into the drain hole manually. Stoppers are a simple and inexpensive solution for controlling water flow, but they can be easily lost or misplaced.
- Features: Simple design, easy to insert and remove, inexpensive.
- Materials: Rubber, silicone.
- Installation: Manually inserted into the drain hole.
Strainers
Strainers are a more permanent solution for controlling water flow and preventing debris from entering the drain. They are typically made of metal or plastic and are installed over the drain hole. Strainers allow water to flow through while catching hair, soap scum, and other small objects.
- Features: Prevents debris from entering the drain, easy to clean, durable.
- Materials: Metal, plastic.
- Installation: Installed over the drain hole, may require a wrench or pliers.
Pop-Up Assemblies
Pop-up assemblies are a more sophisticated type of drain part that combines a stopper and a strainer into a single unit. They are typically made of metal or plastic and are installed inside the drain hole. Pop-up assemblies are operated by a lever or button that raises and lowers the stopper, allowing for precise control of water flow.
- Features: Combines a stopper and a strainer, provides precise water flow control, durable.
- Materials: Metal, plastic.
- Installation: Installed inside the drain hole, requires some plumbing knowledge.
Installation and Maintenance: Bathroom Sink Drain Parts Diagram
Installing and maintaining a bathroom sink drain is crucial for ensuring proper drainage and preventing leaks and clogs. This guide will provide step-by-step instructions on installing a drain, troubleshooting common problems, and outlining regular maintenance tasks to keep your drain functioning optimally.
Regular maintenance can extend the life of your drain and prevent costly repairs. By cleaning, inspecting, and replacing parts as needed, you can ensure that your drain continues to operate smoothly and efficiently.
Installation
- Remove the old drain: Use a wrench to loosen the slip nut that holds the drain in place. Remove the old drain and any debris that may have accumulated.
- Apply plumber’s putty: Apply a ring of plumber’s putty around the base of the new drain. This will create a watertight seal.
- Install the new drain: Insert the new drain into the drain hole and tighten the slip nut by hand. Use a wrench to further tighten the nut, but avoid overtightening.
- Install the pop-up assembly: If your drain has a pop-up assembly, insert the lift rod into the drain and connect it to the pop-up stopper. Tighten the set screw to secure the assembly.
Troubleshooting Common Problems, Bathroom sink drain parts diagram
Clogs
Clogs can be caused by hair, soap scum, or other debris. To unclog a drain, try using a drain snake or a chemical drain cleaner. If the clog persists, you may need to call a plumber.
Leaks
Leaks can occur around the base of the drain or from the pop-up assembly. To fix a leak, tighten the slip nut or replace the pop-up assembly.
Regular Maintenance
- Clean the drain: Regularly clean the drain using a drain cleaner or a mixture of baking soda and vinegar. This will help prevent clogs.
- Inspect the drain: Periodically inspect the drain for any signs of damage or wear. Look for cracks, leaks, or loose connections.
- Replace parts: If you notice any damage or wear to the drain, replace the affected parts promptly. This will help prevent further problems and ensure the drain continues to function properly.
While understanding the bathroom sink drain parts diagram is crucial for repairs, maintaining a clean drain is equally important. For effective cleaning, refer to clean bathroom sink drain. Regular cleaning prevents clogs and ensures optimal drainage. Additionally, understanding the diagram helps identify potential issues and facilitate timely repairs, ensuring a well-functioning bathroom sink drain.
